| Support | Home | Word |
|
|
PageBox |
|
| Presentation | FAQ | Reference | Customisation | Runtime | Forms | Demo | Math | Verification | Downloads | Troubleshooting |
Runtime generation using Cuckoo
| Table of content | |
|
With runtime generation, you deploy:
Cuckoo-generated XML files
XSL style sheets
In some cases other XML files, containing for instance a Site map or News
When the Web server receives an HTTP request it applies a transformation to your XML file using XSL style sheets and returns the result to the user.
Pros:
You don’t need to generate your pages in batch. Your administration is simplified.
You can deliver pages optimized for the user browser version and screen size
You can personalize your content
Cons:
Your server uses more resources, is slower and less scalable
You can be hosted for free for static content. You can have to pay your ASP for dynamic content hosting.
We present here three solutions
Active Server Pages (ASP) with MSXML running on Internet Information Server (IIS). Microsoft.
Cocoon, a Java server application from Apache. Open Source.
Resin, a Java server application from Caucho, free as far as you are not paid or you don’t pay someone to use it. Sources available.
We made tests with:
IIS 5.0
Cocoon 2.0 with Tomcat 4.0.1
Resin 2.0.4
A cuckoo.asp calls MSXML like the static version.
Compared to Cocoon and Resin solutions that we present below the ASP solution doesn’t have a Server cache. However we support browser and proxy caching:
var path; var mypage; var style; function lastModified() { var fs, content, xsl, site, news, lm; path = Server.MapPath(Request.ServerVariables("PATH_INFO")); mypage = new String(Request.QueryString("page")); style = Request.QueryString("style"); var position = path.lastIndexOf("\\"); path = path.substring(0, position + 1); fs = Server.CreateObject("Scripting.FileSystemObject"); content = new Date(fs.GetFile(path + mypage).DateLastModified); xsl = new Date(fs.GetFile(path + style).DateLastModified); site = new Date(fs.GetFile(path + "pagebox-asp.xml").DateLastModified); news = new Date(fs.GetFile(path + "cuckoo-news.xml").DateLastModified); if (content > xsl) lm = content; else lm = xsl; if (site > lm) lm = site; if (news > lm) lm = news; return lm; } function formatDate(lm) { // Use toUTCString because toGMTString is deprecated var strModified strModified = lm.toUTCString(); strModified = strModified.substring(0, strModified.length -3) + "GMT"; return strModified; } var dlm = formatDate(lastModified()); if (Request.ServerVariables("HTTP_IF_MODIFIED_SINCE") == dlm) { Response.Clear(); Response.Status = "304 Not Modified"; Response.End(); } Response.AddHeader("Last-modified", dlm); var xmldoc = new ActiveXObject("MSXML2.DOMDocument"); var xsldoc = new ActiveXObject("MSXML2.DOMDocument"); xmldoc.async = false; xsldoc.async = false; xmldoc.validateOnParse = false; xsldoc.validateOnParse = false; xmldoc.load(path + mypage); xsldoc.load(path + style); if ((xmldoc.parseError.errorCode == 0) && (xsldoc.parseError.errorCode == 0)) { var str = xmldoc.transformNode(xsldoc); str = str.replace("charset=UTF-16", "charset=iso-8859-1"); var a0 = /\u00A0/g; var cuckoo = /<cuckoo>/g; var ecuckoo = /<\/cuckoo>/g; str = str.replace(a0, " ").replace(cuckoo, "").replace(ecuckoo, ""); var pos = mypage.lastIndexOf("W."); var href = /href=\"\#this-doc/g; str = str.replace(href, "href=\"" + mypage.substring(0, pos) + "-doc"); var href = /href=\"\#thisForPrinters.html/g; str = str.replace(href, "href=\"cuckoo.asp?page=" + mypage + "&style=cuckoo-aspPrint.xsl\""); Response.Write(str); } |
cuckoo.asp serves all contents with as many presentation styles as needed.
It is invoked with URLs like this:
cuckoo.asp?page=cuckoo-faqW.xml&style=cuckoo-aspDyn.xsl |
The page parameter points the XML file to display.
The style parameter points the XSL file used for translation.
cuckoo.asp is made of two sections:
The first section with two functions, lastModified and formatDate manages the browser/proxy cache through Last-modified header field.
The second section uses MSXML to transform the page using the style.
Cache management requires more explanations.
Last-modified indicates the date and time at which the server believes the data was last modified.
When a browser has a page in cache, it issues a conditional GET including a special header field, If-Modified-Since. Because it is a conditional GET, if the server returns a response status 304 Not Modified, the browser serves the page from its cache.
Notes:
Cache management doesn’t spare a round trip to the server but it spares the page generation and download most of the time. You can go further if you implement Expires tag. Expire tag gives the date/time after which the response is considered stale. For background information you can read my article.
Resin implements a similar cache management
We include in the delivery two style sheets, cuckoo-aspDyn.xsl and cuckoo-aspPrint.xsl, those differ of cuckoo.xsl and cuckoo-print.xsl only by the site file, pagebox-asp.xml here.
You can download Resin from the Caucho site.
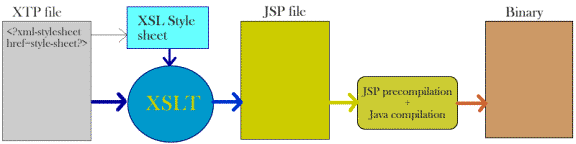
Resin is a Java Application Server conforming to J2EE specifications that includes a support of XML and XSL transformation known as XML Template Page (XTP).
An XTP page is an XML document that can contain a XSL processing instruction.
When a user queries an XTP page, Resin transforms the XML document using the XSL style sheet and returns the result.
We include in the deliveries a WSH script, cuckoo-xtp.js that converts Cuckoo generated files in XTP, which simply means that it adds at the beginning a line:
<?xml-stylesheet href=style-sheet?>.
By default, style-sheet is cuckoo-xtp.xsl:
<xsl:template match="cuckoo"> <html> <head> <xsl:copy-of select="info"/> <link rel="stylesheet" href="cuckoo.css" type="text/css"/> <script src="cuckoo.js"></script> </head> <body> <div id="tooltip" style="position:absolute;visibility:hidden;border:1px solid black;font-size:small;layer-background-color:#ffffaa;color:black;background:#ffffaa;padding:1px"> </div> <xsl:copy> <xsl:apply-templates select="document('pagebox-xtp.xml')/site/header"/> </xsl:copy> <table width="100%"><tr><td valign="top"> <p> </p> <p style="font-size:large;font-family:Verdana;color:#336699;"><xsl:value-of select="info/title"/> </p><p> </p> <xsl:copy-of select="content"/> <p align="center"> <xsl:copy-of select="document('pagebox-xtp.xml')/site/footer"/> </p> </td><td valign="top" align="right" width="250"> <table><tr><td style="background-color:#99ff99"> <xsl:copy-of select="document('cuckoo-news.xml')/cuckoo/content"/> </td></tr></table> <p align="center"> <xsl:copy-of select="toc"/> </p> </td></tr> </table></body></html> </xsl:template> |
The main difference with the style sheets that we see so far is that cuckoo-xtp.xsl expects a slightly different site file:
<site> <header> <line> <field> ... </field> ... <field> ... </field> </line> <table> stripe </table> </header> ... |
The header above is displayed like this:
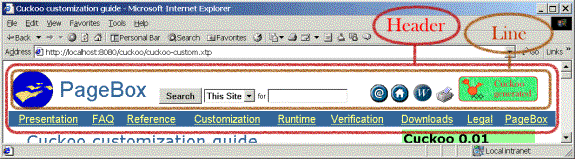
This structure simplifies the XSL coding.
For the Word representation  and for the print version
  we need to update the <a href>.
We write that in cuckoo-xtp.xsl like this:
<xsl:choose> <xsl:when test='@href="ForPrinters"'> <a href='<%= request.getServletPath() + "?cuckoo-xtpForPrinters.xsl" %>'> <xsl:apply-templates select='node()|@*[name(.)!="href"]'/> </a> </xsl:when> <xsl:when test='@href="Word"'> <a href='<%= request.getServletPath().substring(0, request.getServletPath().length() - ".xtp".length()) + "-doc.zip" %>'> <xsl:apply-templates select='node()|@*[name(.)!="href"]'/> </a> </xsl:when> </xsl:choose> |
The real href is computed at run time depending on the location of the XTP file. The code between <% and %> is Java code and <%, %> are JSP tags. The XSLT transformation generates a JSP file, then precompiled into a Java servlet and then in Java binary code. The Java binary code processes user requests, but the first time when the whole processing is performed:
Note the first href:
<a href='<%= request.getServletPath() + "?style=cuckoo-xtpForPrinters.xsl" %>'>
It will translate for instance in:
<a href='/cuckoo/cuckoo-pres.xtp?style=cuckoo-xtpForPrinters.xsl'>.
This feature is only available with Resin 2 that supports Servlet 2.3 specification and filters.
Otherwise you must:
Use cuckoo-xtp.js to generate another XTP file whose <?xml-stylesheet href=style-sheet?> points a style sheet that generates a page suitable for printing
Set href to the print XTP.
A filter is a Java class invoked before the XSL transformation. It can retrieve request parameters such as cuckoo-xtpForPrinters.xsl and set the style sheet.
Here is the filter that we use:
public class XslFilter implements Filter { /** Keep the Filter config. */ private FilterConfig config; /** Set the Filter config. */ public void init(FilterConfig config) { this.config = config; } /** Preprocesses the request. */ public void doFilter(ServletRequest request, ServletResponse response, FilterChain next) throws IOException, ServletException { HttpServletRequest req = (HttpServletRequest)request; String style = req.getParameter("style"); req.setAttribute("caucho.xsl.stylesheet", style); next.doFilter(request, response); } public void destroy() { } } |
It simply set the style sheet to the style value.
Here the hard part is the configuration.
Let’s assume that you store your XML, XTP, CSS, JavaScript, image files in a cuckoo directory:
You must create a WEB-INF subdirectory.
Next you must define two subdirectories in WEB-INF:
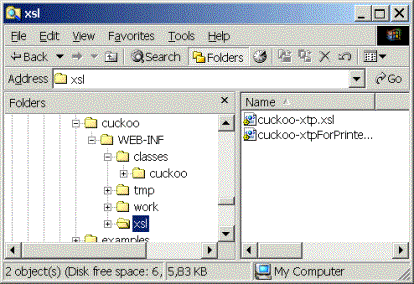
classes where you store cuckoo/XslFilter.class
xsl where you store your style sheets
Don’t worry about tmp and work. Those directories are created by Resin.
Now you must declare your filter in a web.xml file that you create in WEB-INF:
<web-app> <filter-mapping url-pattern='*.xtp' filter-name='cuckoo.XslFilter'/> </web-app> |
You just created an inflated Web Archive. You must describe it in the Resin configuration file, conveniently named resin.conf:
<web-app id='cuckoo'/> |
You can download Tomcat and Cocoon from the Apache site.
With Tomcat 4 and Cocoon 2 the installation is a piece of cake:
Download the binary versions and inflate the downloaded archives
Copy cocoon.war from cocoon-2.0 to jakarta-tomcat-path/webapps
Set JAVA_HOME=jdk-path
Set CATALINA_HOME=jakarta-tomcat-path
Run startup.sh or startup.bat (jakarta-tomcat-path/bin)
Cocoon is a XML publishing framework that exists in two versions.
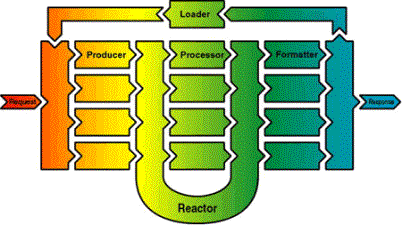
When Cocoon receives an HTTP request, it invokes a Producer. The Producer generates an XML document. Then the reactor invokes processors to transform or massage the document. Eventually it invokes a formatter to format the document and returns the formatted document to the requestor.
How the reactor knows which processors and formatter it must invoke? Through XML processing instructions included by the producer or by processors.
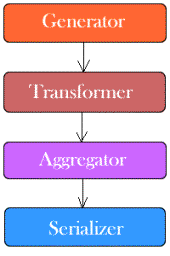
Cocoon 2 is a complete rewrite of Cocoon 1. It is more scalable than Cocoon 1. Reactor pattern is replaced by a less flexible but simpler pipeline mechanism and all components were renamed:
| A generator produces an XML document. The most common generator is the file generator that simply reads an XML file. A generator is the equivalent of a Cocoon 1 producer. A transformer transforms an XML document. The most common transformer is the XSLT transformer. A transformer is the equivalent of a Cocoon 1 processor. An aggregator merges XML documents. A serializer render an XML document for instance in HTML or in PDF. A serializer is the equivalent of a Cocoon 1 formatter. |
Cocoon can handle regular XML as well as XSP.
For our use (see below) XML is enough. However we chose to generate XSP file because they can be easily extended to support form parameters and manage cookies and sessions.
Here is a simple XSP example from Cocoon 2 documentation:
<?xml version="1.0"?> <?cocoon-process type="xsp"?> <xsp:page xmlns:greeting="http://duke.edu/tutorial/greeting" xmlns:xsp="http://www.apache.org/1999/XSP/Core" > <greeting> <xsp:logic> // this could be arbitrarily complex Java code, JDBC queries, etc. String msg = "Hello, world!"; </xsp:logic> <xsp:expr>msg</xsp:expr> </greeting> </xsp:page> |
XSP allows you to mix XML and Java code.
You can also define which transformation to apply:
<?xml-logicsheet href="logicsheet.greeting.xsl"?> |
We use the file generator, the xslt transformer and the HTML serializer
The first step is to define our pipelines in sitemap.xmap:
<map:match pattern="cuckoo/*.xsp"> <map:generate src="cuckoo/{1}.xsp"/> <map:transform src="cuckoo/cuckoo-xsp.xsl"/> <map:serialize/> </map:match> <map:match pattern="cuckoo/*.gif"> <map:read src="cuckoo/{1}.gif" mime-type="image/gif"/> </map:match> <map:match pattern="cuckoo/*.jpg"> <map:read src="cuckoo/{1}.jpg" mime-type="image/jpeg"/> </map:match> <map:match pattern="cuckoo/*.css"> <map:read src="cuckoo/{1}.css" mime-type="text/css"/> </map:match> <map:match pattern="cuckoo/*.js"> <map:read src="cuckoo/{1}.js" mime-type="text/javascript"/> </map:match> <map:match pattern="cuckoo/*.txt"> <map:read src="cuckoo/{1}.txt" mime-type="text/plain"/> </map:match> <map:match pattern="cuckoo/*.zip"> <map:read src="cuckoo/{1}.zip" mime-type="application/zip"/> </map:match> |
Assuming that you installed Cocoon as described above, you should be able to access Cocoon with the URL http://localhost:8080/cocoon. With the parameters above, you should be able to invoke a cuckoo generated file myfile.xsp stored in tomcat_dir/webapps/cocoon/cuckoo with the URL http://localhost:8080/cocoon/cuckoo/myfile.xsp.
We apply the same XSLT cuckoo/cuckoo-xsp.xsl to all documents ending with .xsp.
We also customize Cocoon to serve images, text, css, javascripts and even zip files from that dir.
For printing we use different URLs to serve the same XSP with a different style sheet:
<map:match pattern="cuckoo/forPrinters/*.xsp"> <map:generate src="cuckoo/{1}.xsp"/> <map:transform src="cuckoo/cuckoo-xspForPrinters.xsl"/> <map:serialize/> </map:match> |
We include in the deliveries a WSH script, cuckoo-xsp.js that converts Cuckoo generated files in XSP. The script simply adds an element at the beginning of the files:
<page>name</page> where name is the name of the file.
The cuckoo-xsp.xsl style sheet is like this:
<xsl:variable name="page" select="cuckoo/page"/> <xsl:template match="cuckoo"> <html> <head> <xsl:copy-of select="info"/> <link rel="stylesheet" href="cuckoo.css" type="text/css"/> <script src="cuckoo.js"></script> </head> <body> <div id="tooltip" style="position:absolute;visibility:hidden;border:1px solid black;font-size:small;layer-background-color:#ffffaa;color:black;background:#ffffaa;padding:1px"> </div> <xsl:copy> <xsl:apply-templates select="document('pagebox-xsp.xml')/site/header"/> </xsl:copy> <table width="100%"><tr><td valign="top"> <p> </p> <p style="font-size:large;font-family:Verdana;color:#336699;"><xsl:value-of select="info/title"/> </p><p> </p> <xsl:copy-of select="content"/> <p align="center"> <xsl:copy-of select="document('pagebox-xsp.xml')/site/footer"/> </p> </td><td valign="top" align="right" width="250"> <table><tr><td style="background-color:#99ff99"> <xsl:copy-of select="document('cuckoo-news.xml')/cuckoo/content"/> </td></tr></table> <p align="center"> <xsl:copy-of select="toc"/> </p> </td></tr> </table></body></html> </xsl:template> <xsl:template match="line"> <table width="100%"><tr> <xsl:apply-templates select="node()"/> </tr></table> </xsl:template> <xsl:template match="field"> <td> <xsl:copy-of select="node()"/> </td> </xsl:template> <xsl:template match="table"> <xsl:copy-of select="."/> </xsl:template> <xsl:template match="field-link"> <td><font class="seek"> <xsl:apply-templates select="node()"/> </font></td> </xsl:template> <xsl:template match="a"> <xsl:copy-of select="."/> </xsl:template> <xsl:template match="link"> <xsl:choose> <xsl:when test='@href="ForPrinters"'> <a href='forPrinters/{$page}.xsp'> <xsl:apply-templates select='node()'/> </a> </xsl:when> <xsl:when test='@href="Word"'> <a href='{$page}-doc.zip'> <xsl:apply-templates select='node()'/> </a> </xsl:when> </xsl:choose> </xsl:template> <xsl:template match="img"> <xsl:copy-of select="."/> </xsl:template> |
It uses the same site file format as the Resin version.
For the Word representation  and for the print version
  we need to update the <a href>.
To do that we first store the name value in a variable:
<xsl:variable name="page" select="cuckoo/page"/>
Then we update the <a href> using the variable, for instance:
<a href='forPrinters/{$page}.xsp'>
Contact:support@pagebox.net
©2001-2004 Alexis Grandemange.
Last modified
.